PRODUCTS


Cin 7 Tips & Tricks


- Accounting for Webstore Sales
- Comparing Cin7 and Xero Reconciliation Report
- GST on Imports
- How to account for warranties and promos
- Clearing your Cache just for Cin7
- Correcting Post Codes where Excel drops leading zeros
- Junk Email Fix
- Deposits from Offshore Suppliers
- How Product Costs Update
- Applying Landed Costs to a Purchase Order
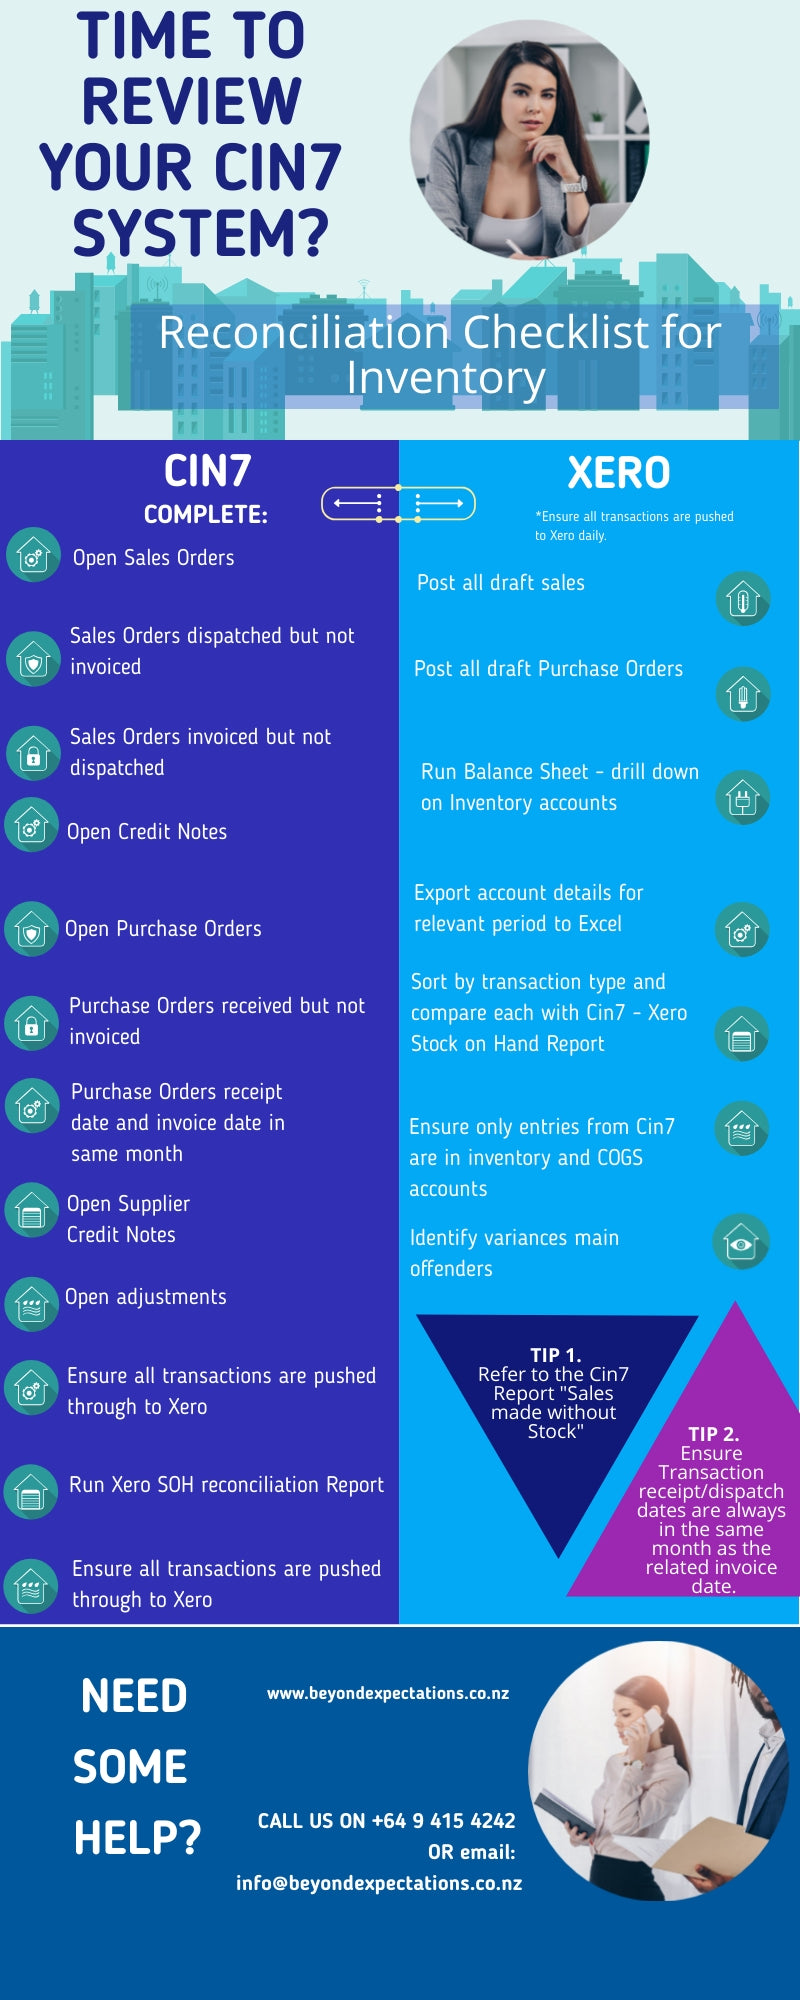
- This Reconciliation Checklist for Inventory is a must with Cin7 and Xero
Accounting for Webstore Sales
For many businesses, the number of transactions coming from a sales order system are significant and requires a considerable amount of effort to reconcile payments to invoices.
Web-based sales fall into this category. Usually, the sale is only allowed when payment has been received at the webstore, so reconciling the receipt of money related to a sale is generally not required – at least not on an invoice by invoice basis.
In the discussion below a methodology is described related to the use of Cin7 inventory management software and Xero accounting software.
Method:
It is preferable to group sales in a logical manner that makes it easier to tie into methods of payment. Examples might be by currency, Paypal, Amex, other Credit Cards, etc.
Let’s assume sales are split by currency.
- NZD
- AUD
- Other
Transactions flow from Cin7 to Xero for each sales order but classified to one of three ‘Customers’.
- NZD Sales
- AUD Sales
- Other Sales
These become Contacts in Xero and accumulate a massive number of transactions waiting for payments to be applied to them. For most businesses, there is a need to match every payment to specific invoices. When the volume of invoices is large and payment required before a sale occurs there is a tendency to be less specific.
To this end, bank deposits appearing in the Xero bank accounts for sales related transactions may get allocated across sales transactions in a broad-brush approach.
The best way to do this is to use the find and match function in Xero bank reconciliation. Search for the contact – eg NZD Sales, a list of the outstanding NZD sales invoices will display. Apply the payment to the oldest invoices (ideally, they would be no more than a day or two old) balancing to the amount of the deposit. There may be a need to split an amount on an invoice to achieve a balance, but the remaining amount will clear in the next round.
This approach will ensure all transactions that flow from a webstore through to inventory management and through to the accounting system will be properly accounted for. It completes an audit trail, ensures GST is accounted for correctly and will highlight issues if balances in each of the three contacts start to build up.
This would work best for a business that is approving their drafts every day and has a tight focus on being up to date every day.
Comparing Cin7 and Xero Reconciliation Report
- Open blank Excel doc and paste in each month's data in from the Stock on Hand Xero Reconciliation Report in Standard Reports
- In Xero go to Balance Sheet and Cin7 Inventory account – select the oldest month range first and check closing balance:
- Export the list from Xero into Excel and sort by COGS, Adjustments and then PO’s. Compare the data starting with COGS as it will only be one entry. Then add up any stock adjustments – these will all just be your local currency. Lastly check the PO’s – these may have FX variances which is the likeliest reason for any discrepancies. If the data from the PO’s is entered into Cin7 with the amount paid in your local currency this will adjust the data to be correct and match up. Repeat for each month.
- You can compare with Historic Stock on Hand at the end of each month, although this data is calculated differently and how sales and purchases are dated will affect this.
- Request from Cin7 that COGS columns show in Sales and Purchase orders main screens
- Compare month by month and note the variations
- Check Purchase Orders – that all received are imported and vice versa and that it was in the same month.
- Check Sales Orders – that all have been dispatched and all COGS generated for them. Sometimes not all items in a sales order have been dispatched but the field “fully dispatched” is populated. If this happens it will give a variance, so this is good to check.
- If a retail store is using laybys, then COGs will always be behind in the stock valuation report as the items are not accounted for in the COGS journal until the layby is completed.
Note: IF you have a historical imbalance you can create a stock adjustment and set to “Do Not Import”.
This will update your balance sheet to be in line with your stock on hand. But tread warily!!! All data must be complete (sales/purchase orders adjustments, credits, branch transfers).
This option would only be recommended ONCE and ONLY when you’re able to also complete a total stocktake across all products/locations.
GST on Imports
If you receive freight bills and a portion of the bill contains GST – you don’t want this to affect your COGs in Cin7.
You can either split the bill – enter the landed costs in Cin7 and the GST directly into Xero (Use the same supplier invoice number, just add “A” to one, and “B” to the end of the other.
Alternatively, it’s possible to create an alternative Tax Rate for GST – so the data can be entered in Cin7 but pass straight through to the GST code within your Xero accounts.
First – make sure you’ve done “Get Tax Rates” from Xero on set up.
In Settings, Alternative Tax Rates enter as below:

Active: ON
Sort: (any)
Name: GST on Imports
Apply To: (leave blank)
Quick Books Tax Rates ID: (leave blank)
Xero Tax Types Codes: GSTONIMPORTS
Purchases or Sales: Purchases
Tax Rate: 0

Then when entering the freight invoice, simply select GSTONIMPORTS from the account column.
How to Account for Warranties and R&M Product in Cin7
How to account for Warranties and R&M product in Cin7
The process below allows for reclassification of COGS to a Warranty, Promo or Advertising/Marketing cost/expense code.
Customers may order parts for the repair of equipment. The transaction is treated as a sale and invoiced to the customer in the first instance with the intention that the customer will pay for the items.
If you consider the need for the parts to be covered by a warranty claim, the customer will be issued with a credit note for the items invoiced. This puts the items back in stock and nullifies the sale.
The items still need to be taken out of stock. Do so by setting up a customer called “YOUR BUSINESS NAME Warranties” and create a sale to this “customer” at a price of $0.01.
The 1 cent is vital to allow the transaction to work its way from Cin7 to Xero correctly.
The balance due in the internal Warranties account may be written off as rounding amounts in Xero. Do so by creating a credit note in Xero and allocating it to the invoice.
This process means that the reduction in your stock will be accounted for and the cost of the items will have been deducted from inventory and added to Cost of Goods sold in the General Ledger.
If you wish to reclassify the costs from COGS to Warranty claims expense code create an entry on Xero as a Purchase – a bill to debit Warranties on one line item and credit COGS on another line, with a net impact of $0 outstanding. The COGS figure relevant to the transaction will be visible on the Review screen of the transaction in Cin7.
The same process applies to Promo and R&D stock.
Cin7 suggests the following in their help menu.
There are two ways to deal with promotional or free stock.
See the options below:
- Write-off stock through adjustments, the cost will go to ‘adjustments’ account, without affecting ‘Gross Profit’, but ultimately affecting Net Profit. When doing this, cost should remain intact (not zeroed out), this will ensure the average cost of the product is unaffected and the cost is journaled in QB/Xero out of Inventory.
- Do ‘Sales’ with 100% discount and COGS will be directed to either nominated default a/c or any other expense account the customer chooses which gives flexibility in terms of reporting. This will affect the Gross Profit (GP) and NP. At the end of the day, any write-offs/100% discounts reduce the margin.
Clearing your Cache just for Cin7
Make sure you’re on a page in Cin7
Right-click on the screen.
Select Inspect
Top right, click on Application (if not showing, click on the double chevron)
Click on Clear Cache button at the bottom
Correcting Post Codes where Excel drops leading zeros
If a section of data has leading zeros dropped (often for NZ Postcodes) you can add using the Custom function under Format Cells.
- Highlight section of data
- Right-click and open “Format Cells”
- Select Custom from the Category list
- Type “0000” into the “Type” field. To add one zero to the front of three digits, you would put four zeros (see below) – for four, you would put five zeros, etc…
- Click “OK” and data will be corrected.
You can also select all on a worksheet and format all cells to “Text” before copy/pasting your text into it. This will retain the leading zeros and prevent sizes (like 3-5 or 9-11) converting to dates.
Junk Email Fix
If Cin7 emails are going to your customers' “junk” file – here is the process to correct it. It can be a bit complex, so if you need assistance your domain provider should be able to do this for you.
Overview
When you email from Cin7, it is sent on your behalf, i.e. the ‘from’ address will be the one associated with your user account. This is great, however, you may find that this causes the emails you send from Cin7 to be blocked by your recipient’s spam filters. The simple solution is for your recipient to add an “SPF” record.
Process
To notify ISPs that Cin7 is allowed to send emails on your behalf, add the TXT record below to the specific DNS Records of the domain you are sending from.
v=spf1 mx a ip4:219.88.246.20/32 ip4:219.88.246.23/32 ip4:219.88.246.25/32 ip4:219.88.246.26/32
If you already have an SPF record – for example, if you are using Outlook you may have “v=spf1 include:spf.protection.outlook.com -all”
In this case, you will need to add the Cin7 address before the “include” statement. Note that you can only have one SPF record per domain so you will need to edit the existing one.
E.g:
v=spf1 mx a ip4:219.88.246.20/32 ip4:219.88.246.23/32 ip4:219.88.246.25/32 ip4:219.88.246.26/32 include:spf.protection.outlook.com -all
Deposits to Offshore Suppliers
If you make a payment to an offshore supplier – don’t process your Cin7 PO prematurely or create an invoice in Xero – simply reconcile it as a Pre-Payment (or Over-Payment if in a foreign currency so you can calculate the rate) to the supplier contact in Xero. It can remain there on the account until the Purchase Order is completed in Cin7 and sent through, and then you can match it up.
This treats it in the correct way for accounting purposes (as you don’t own the goods yet – you’ve just sent a financial transaction to your supplier) and also keeps the data correct in Cin7 for managing your stock.
How Product Costs Update
Cin7 will update the last cost of products on Purchase Orders as long as if follows these rules:
- The Purchase Order must be in the name of the Preferred Supplier for the Product
- There must be more than one item purchased.
This will update the “cost” on a product automatically so you don’t have to go in and update.
Applying Landed Costs to a Purchase Order
After you’ve received in product from your stock supplier, you may receive a separate bill from your freight forwarder for the cost of shipping the goods from their warehouse to yours.
There may be charges without GST for the movement of the goods from their location to your local Port, then there may be additional charges for movement locally that do include a GST portion. There may also be the Import GST content of your products that they have paid on your behalf and are requesting back from you (unless you have a New Zealand Customs deferred GST account).
To apply these costs to the products you’ve received, you raise a separate purchase order for the freight and transaction link it to your product/stock purchase order. Follow these steps:
First, raise a new purchase order to the freight forwarder. Enter “Freight” – this product should be set up as non-stock. Once it’s transaction linked, Cin7 converts it to a stock cost.
You may have some lines that include GST and some that don’t. There is no need to type in each and every line, just run one line and sub-total all the costs that include GST, and then do another line a sub-total those without GST. For the inclusive, it’s important to just leave the accounts column blank, but for the GST exclusive you can select “No GST”. The total at the bottom should match what is on their invoice.
If a portion of your bill involves GST on Imports – set up a new product called GST on Imports (non-stock) and create an Alternative GL account (in settings) to ensure this goes to the GST on Imports account in Xero – this alternative account can be set up to default to this account when you’re creating these freight bills. We do this all the time, so get in touch if you would like some help setting it up correctly.
Once you’ve created this bill for freight, fully receive and add invoice date/ref and approve – it’s important to complete and save the PO before trying to do the transaction link or it sometimes won’t link.
To do the transaction link:
- Go back into the freight PO and click on the Transaction Links column
- Enter the stock PO ref (you need to put “PO-“ at the beginning if you’re using the number, or search by the supplier name
- Click Allocate
- Once you’ve clicked allocate it will show quantity “1”. If you want to split this cost against multiple PO’s enter the quantity in decimals – then search and add the other PO’s. Otherwise, leave as “1” to allocate the whole amount.
- Save
- Check that it says “Fully Allocated” in Green – not “Over-allocated” in Red or partially allocated in just black.
- Ensure each line of freight is allocated – but DO NOT ALLOCATE the GST on Imports line (or you’ll pay for your GST twice!)
In the Admin screens, you’ll be able to see the linked transactions in both the freight/landed bill and the product purchase order/s. You can click on Admin to go to that transaction to view it and also check the report that will show the landed costs per product for that particular PO and how it’s allocated line by line.
The freight bill will also now be in the Xero queue ready to import and you can push this through and approve. Do not change the data once it’s gone through to Xero. It should show in the Inventory GL account if it’s been done correctly.
This Reconciliation Checklist for Inventory is a must with Cin7 and Xero.
For many businesses in New Zealand and Australia, trading conditions are far from normal at present. Many essential services are operating at maximum capacity to keep up with demand while others have had to shut down to comply with the LockDown rules. For those organizations using cloud-based software, working from home is an option, even when normal operations have ceased.
This could be a good time to do a little housekeeping on your system. We have some useful tips for Cin7 users that will help you tidy up your data and gain greater accuracy of your inventory figures. It may also clear some of the clutter that can build up in systems and allow you to understand some ‘best practice’ techniques for your software.
Products
APICAL
Unleashed
Cin7
Xero
WorkflowMax
Also in Tips & Tricks


Xero Tips & Tricks
We've put together some helpful Xero tips & tricks. Feel free to browse through get familiar. If there are any we've missed, we'd love to know.
Read More

WorkflowMax Tips & Tricks
We've put together some helpful Workflowmax tips & tricks. Feel free to browse through get familiar.
Read More